SOFTWARE
SOFTWARE
SynDash Lite
Record and monitor all tracking data, and real time viewer.
SynDash Lite allows you to monitor the state of sensors; You can record,
replay and save data and export to BVH or FBX. Includes Skeleton Manager and Raw Data Capture.

SynDash Lite
Record and monitor all tracking data, and real time viewer.
SynDash Lite allows you to monitor the state of sensors; You can record,
replay and save data and export to BVH or FBX. Includes Skeleton Manager and Raw Data Capture.
G6 Glove Instruction Manuals
G6 Wired Glove Instruction Manual:
This manual gives basic instructions for setting up the G6 wired gloves in SynDash.
1.Software Setup
1.1 Download the latest version of SynShow (diagnostic SW) and SynDash(for general use) in this folder.
1.2 SynDash:
1.2.1 You will need to run ‘SynDash.exe’ and enter the license key that was sent to you via email from peter.skorik@synertial.com
1.2.1.1 If you do not have a license key, you can register for a trial version of SynDash.
1.2.2 SynDash will perform a license check at this time so you will need to be connected to the internet. You will need to perform this check every 3 days.
1.3 SynShow is a diagnostic software and so is not generally needed unless troubleshooting is needed.
1.4 You will also need to download the USB driver, which can be found here.
2. Setting up the glove
2.1 Open up the case shown in the image 2.1, which contains the gloves, USB connection cable and straps.
2.2 Plug the USB-C connector from the glove into the USB connection cable as shown in the image 2.2.
2.3 Plug this cable into the PC.
2.3.1 It is important that the steps are followed in order. If the USB A cable is plugged into the PC before the glove is connected, the device won't be recognised.
3. Wearing the glove
3.1 Put the glove on and ensure that the sensors are in the correct place, as shown in image 3.1. You should be able to feel the sensors inside the glove.
4. Connecting the glove to the software
4.1 Go to device manager and to 'COM Ports' to locate the port number of the glove.
4.1.1 You can unplug the glove to find which device it is. Remember the port number.
4.1.2 If you can’t find the port number, please download the drivers here and try again.
4.2 Go to the SynShow folder followed by x64 folder and then create a shortcut of ‘USBHub’.
4.2.1 Go to this shortcut and open properties, then input the port number at the end of the path like this “ -p6”. Ensure you use a space before the dash.
4.2.2 Run the shortcut - you should see the message “found 9 sensors”.
4.2.2.1 If this message is not found, check the path/port number again and try again. If this doesn't work, contact AiQS.
5. Connecting the glove in SynDash
5.1 Open SynDash SW.
5.2 The gloves should be found automatically.
5.2.1 This can take a moment; wait until the blue circle stops spinning.
5.3 If the glove is not found automatically, then click the green circle shown in image 5.3. If this does not work, check step 1 of the manual.
5.4 Once they are connected you will see the device in the top right corner, as well as in the viewer window.
6. Skeleton Files
6.1 Once the glove is found, you need to open the skeleton file.
6.2 Go to the Load Skeleton file button shown on image 6.2, or go to File>Load Skeleton.
6.3 Open the Skeleton file. Skeleton Files can be found here.
6.3.1 In here you will find one set of SKs for general use, and another if there are harsh magnetics present. Try the general use ones first.
7. Sensor Status
7.1 Once the glove is connected and you have the correct Skeleton file, you need to check the sensor box to make sure that all the sensors are high accuracy (green) and ready for mocap.
7.2 Look at the sensor box as in image 7.2.
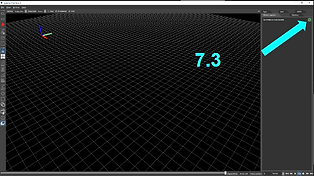
7.3 To make all the sensors green, you need to rotate all sensors around all 3 axes (x,y,x).
7.3.1 After completing this step, stop and wait to see if the sensor status has changed. If all are high accuracy at this point then you can move to the next step. If not, repeat 7.3.
8. Calibration
8.1 See the side image of the calibration poses.
8.2 It is very important that you move straight down from pose 1 to pose 2, and not at an angle.
8.3 There are two options to calibrate:
8.3.1 Option 1: Press ‘Set Pose 1’ while in the pose 1 position. Press ‘Set Pose 2’ while in the pose 2 position
8.3.2 Option 2: Use the ‘Auto-Calibrate’ feature and follow the instructions on the screen.
This needs to be done with the sensors all green.
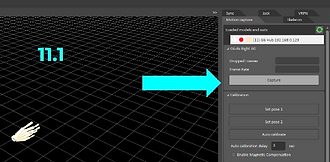
9. Data Capture Once the glove is calibrated, data can be recorded.
9.1 To Capture:
9.1.1 Press the ‘Capture’ button on the right task bar (image 9.1) to start the recording.
9.1.2 Press the same button to stop recording.
9.2 Once you have finished recording, a new line will appear at the top right of the screen. This is the recording file.
9.2.1 You can hide this recording or change its colour.
9.3 Saving the recording:
9.3.1 Recordings are saved automatically.
9.3.1 To locate, right click on the recording at the top right and press ‘Open Containing Folder’.
9.4 Exporting the recording:
9.4.1 Click on the recording in the top right and open the ‘Export’ tab about half way down.
9.4.2 Select one of the options and save the file (image 9.4).
10. Further Information
10.1 For a comprehensive guide on all the features of SynDash, see this document.
10.2 If you have any questions, please contact noah.dvh@aiqsynertial.com.